The modern kitchen, once a purely utilitarian space, has evolved into a central hub for living and entertaining, often embracing open shelving as a design statement. This trend, popularized in minimalist and Scandinavian interior aesthetics, promises an illusion of expansive space and enhanced light, breaking away from the traditional, bulky upper cabinets that can make kitchens feel enclosed. However, the allure of picture-perfect open shelves often clashes with the practical realities of daily life, leading many homeowners to find their once-aspirational displays quickly devolving into visual clutter. The key to successful open shelving lies not just in installation, but in a holistic approach to design and diligent management of its contents.
The Allure and Reality of Open Shelving
The transition from enclosed cabinetry to open shelving is frequently motivated by a desire to lighten the visual load of a kitchen, making it feel larger, brighter, and more inviting. By exposing kitchenware and ingredients, open shelves can inject personality and warmth into the space, transforming everyday items into decorative elements. This design choice also promotes accessibility, keeping frequently used items within easy reach, which can streamline cooking processes.
However, the perceived benefits come with significant responsibilities. Many homeowners, captivated by magazine spreads, overlook the rigorous curation and maintenance demanded by open shelving. Unlike hidden cabinets, open shelves offer no refuge for mismatched items, unsightly packaging, or accumulated dust. The failure to commit to a disciplined approach often results in a cluttered, unhygienic, and ultimately frustrating kitchen environment. Experts in interior design emphasize that open shelving is not a storage solution for overflow but a deliberate display choice that requires a commitment to order, aesthetic consistency, and regular cleaning. Without these elements, the dream of a spacious, stylish kitchen can quickly turn into a messy nightmare.

Precision in Design: Key Dimensional Specifications
To avoid the pitfalls of haphazard installation, precise dimensional planning is paramount. Industry standards and ergonomic considerations dictate specific measurements for shelf placement, depth, and material choice to ensure both functionality and aesthetic integrity.
Shelf Height and Clearance
The initial shelf, positioned directly above the countertop, demands careful consideration for ergonomic clearance. A minimum distance of 45 cm (approximately 17.7 inches) from the countertop is strongly recommended, with an ideal range extending to 50 cm (19.7 inches). This critical space ensures ample room for operating countertop appliances such as blenders, coffee makers, or stand mixers without obstruction. Insufficient clearance can render these appliances impractical to use or even inaccessible.
Subsequent shelves should maintain a vertical distance of 30 cm to 40 cm (11.8 to 15.7 inches) from one another. This spacing is generous enough to accommodate standard dinner plates stacked neatly, medium-sized storage jars, or small decorative items without appearing cramped. For kitchens with exceptionally high ceilings, a third shelf may be added, but designers advise keeping the highest shelf within an easily reachable height, typically no more than 2 meters (approximately 6 feet 6 inches) from the floor, even with the aid of a step stool. This ensures that the shelf remains functional and accessible for cleaning and item rotation.
Optimal Shelf Depth
One of the most common design missteps is installing shelves that are too deep. While seemingly offering more storage, excessive depth inevitably leads to items being pushed to the back, becoming forgotten, dust-laden, and creating shadowy recesses that detract from the clean aesthetic. The ideal depth for open kitchen shelves ranges from 25 cm to 30 cm (9.8 to 11.8 inches). This measurement is perfectly adequate for accommodating the largest dinner plates and encourages single-file arrangement of items.

Shallower shelves, particularly those in the 20-25 cm range (7.9 to 9.8 inches), actively prevent visual clutter by limiting the capacity for excessive stacking. This forces a more deliberate selection and arrangement of items, promoting a streamlined look where every object is visible and purposeful.
Material Thickness for Durability
The material thickness of the shelves themselves is not merely an aesthetic choice but a crucial structural consideration, especially given the weight of ceramic dinnerware and glassware. A minimum thickness of 3.5 cm (1.4 inches) is advised, with thicknesses up to 5 cm (2 inches) being ideal. Thin shelves, those under 2 cm (0.8 inches), are prone to sagging over time due to the sustained weight, creating an unsightly and potentially unsafe condition. Thicker shelves not only offer superior load-bearing capacity but also impart a sense of solidity, quality, and architectural robustness that elevates the overall design of the kitchen, aligning with a premium aesthetic.
Mastering Visual Harmony: The Art of Curation and Composition
Beyond mere measurements, the art of styling open shelves lies in meticulous curation and adherence to visual merchandising principles. The goal is to create an inviting display, not a cluttered inventory.
The 60/40 Rule: Embracing Negative Space
A fundamental principle employed by professional stylists is the 60/40 rule, which dictates that shelves should be filled to a maximum of 60% of their visual capacity, leaving the remaining 40% as "negative space" or empty areas. This generous allowance of blank space is crucial for visual respite, allowing the eye to rest and appreciating the individual items on display. Without adequate negative space, shelves appear overstuffed and chaotic, overwhelming the viewer. This deliberate emptiness elevates the perceived value and aesthetic appeal of each item, making a simple stack of white bowls or a small vase appear more significant and artful. In contemporary interior design, negative space is a luxury that communicates sophistication and thoughtful design.

The Rule of Three: Asymmetrical Balance
When arranging items, the "Rule of Three" (or other odd numbers like five) is a powerful tool for creating dynamic and visually engaging compositions. Human perception naturally finds arrangements of odd numbers more appealing and less rigid than even numbers. For instance, instead of two identical jars, group one tall pasta jar, one medium coffee jar, and one shorter sugar jar. The varied heights create an appealing asymmetrical triangle, adding visual interest. Similarly, displaying three or five glasses together feels more organic and less like a retail stock count. This principle adds a layer of natural elegance to the arrangement.
Strategic Item Placement: Accessibility Zones
Ergonomics plays a vital role in kitchen design, ensuring an efficient workflow. Open shelves should support this efficiency, not merely serve as static display galleries. Items should be categorized and placed according to their frequency of use.
-
Zone 1: The Bottom Shelf (Daily Use)
The most accessible shelf, typically at eye level, should house "workhorse" items used daily. This includes everyday dinner plates, soup bowls, and drinking glasses. The high turnover of these items ensures they are regularly washed, preventing the accumulation of dust and greasy kitchen residue. Dishes should be stacked neatly by size, with a maximum of 8-10 items per stack to maintain stability and ease of access. Consistency in color, such as an all-white dinnerware set, contributes significantly to a clean and cohesive look. -
Zone 2: The Middle Shelf (Weekly Use & Curation)
The second shelf is ideal for functional items used several times a week, such as larger serving bowls, teapapots, or frequently referenced cookbooks. This zone also offers an opportunity to introduce subtle decorative touches. A beautifully grained wooden cutting board leaned against the back wall of the shelf can serve as an elegant backdrop for a stack of bowls. It’s important to maintain visual balance across the shelf; if a visually heavy stack of plates is on the left, balance it with a proportionally sized ceramic pitcher on the right. -
Zone 3: The Top Shelf (Decorative & Low Access)
The highest shelf is reserved for items that are rarely touched and serve primarily aesthetic purposes. This is the perfect spot for tall ceramic vases, high-quality artificial trailing plants like pothos (Devil’s Ivy) for a splash of refreshing green, or framed artwork. Crucially, avoid placing heavy or fragile items on the top shelf due to the inherent safety risks involved in retrieving them, especially with wet or slippery hands. Lightweight decorative pieces are the safest and most effective choices for this zone.
The Psychology of Color and Presentation
A major culprit behind cluttered-looking open shelves is a chaotic mix of colors. A restricted color palette is a powerful tool for achieving a sophisticated and serene aesthetic.
Monochromatic Palettes for Elegance
The safest and most elegant approach is to adopt a monochromatic or tightly curated color palette. If your shelves are crafted from warm teak wood, pair them with a collection of pure white dinnerware. The crisp white creates a striking yet harmonious contrast against the dark wood, unifying the display and subtly minimizing the perceived quantity of items. Beyond white, other neutral palettes such as cream, light grey, or earthy tones like terracotta, currently a popular choice, can create a similarly sophisticated effect. The key is consistency across all displayed items.
Concealing Retail Packaging
One of the quickest ways to undermine an aesthetic kitchen design is to display commercial retail packaging. Cereal boxes, plastic bags of flour, and branded cooking oil bottles, with their varied logos and vibrant colors, are visual antagonists to a curated look.
Decant all dry goods into uniform, airtight glass jars with wooden lids. Olive oil and soy sauce can be transferred into elegant glass bottles or ceramic dispensers. Invest in minimalist labels, perhaps black text on a white background, for each container. This transformation not only enhances the visual appeal but also creates a boutique-like display, turning pantry staples into design elements.
Structural Integrity and Aesthetic Integration: Mounting Systems

The choice of mounting system for open shelves significantly influences the final aesthetic and structural performance of your kitchen. Each system offers distinct advantages and visual characteristics.
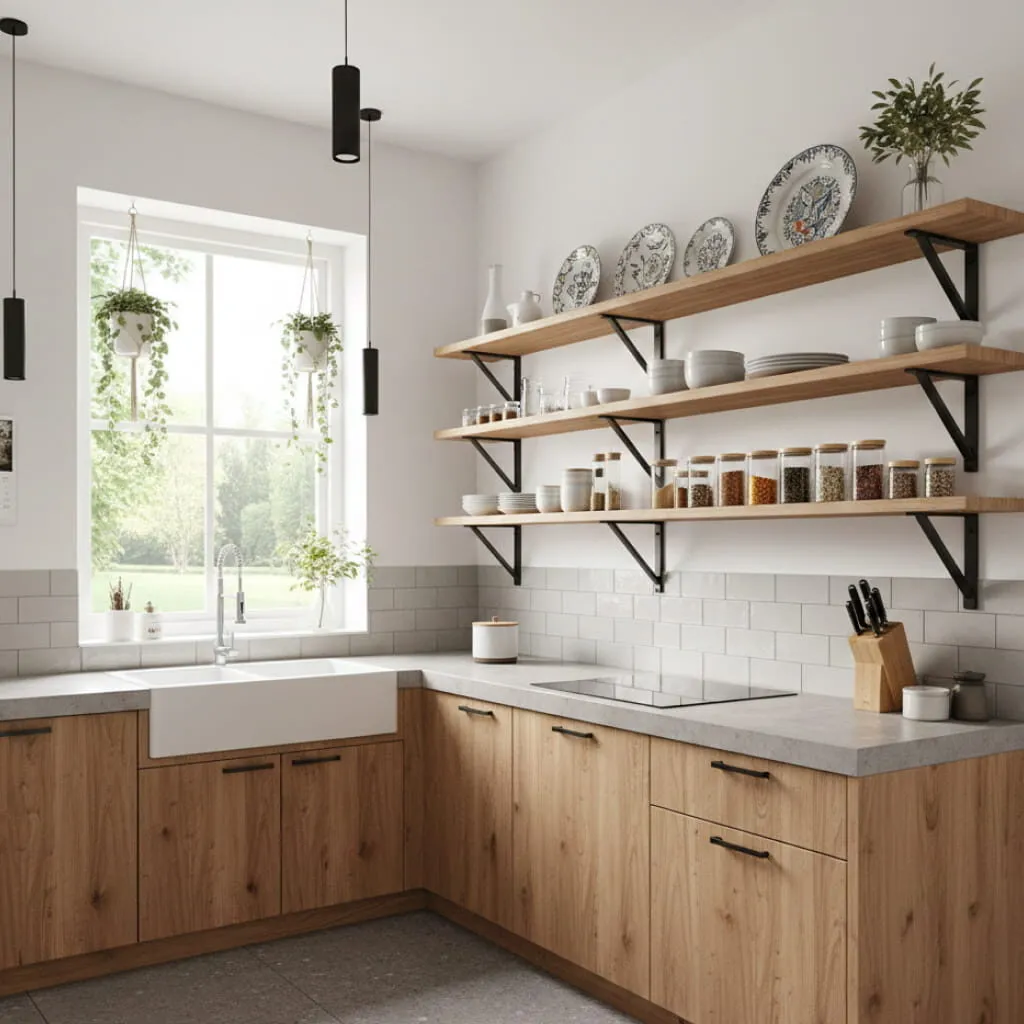
Seamless Floating Shelves
Floating shelves are renowned for their sleek, minimalist appeal, creating the illusion that the wooden planks are magically suspended against the wall. This style is particularly suited for modern, minimalist, or Scandinavian kitchen designs, where clean lines and an uncluttered look are paramount.
The installation of floating shelves is precise and typically involves embedding robust metal rods or brackets directly into the wall structure, which then slide into pre-drilled holes in the shelf. This method demands strong wall materials like brick or concrete and professional installation to ensure stability and load-bearing capacity. While aesthetically superior, the structural requirements and installation complexity are higher.
Robust L-Brackets Minimalist and Industrial
For those seeking a more straightforward installation or requiring greater load support, exposed L-brackets offer a versatile and sturdy solution. These brackets, typically made from thick metal, can be chosen to complement the kitchen’s style. Matte black brackets can enhance an industrial aesthetic, while brass or polished nickel brackets can add a touch of classic luxury.
L-brackets provide superior strength and are highly recommended for supporting heavy ceramic collections. To prevent sagging over time, brackets should be evenly spaced, ideally every 60 cm to 80 cm (23.6 to 31.5 inches) along longer shelves. This visible hardware can become an integral part of the design, contributing to the overall character of the kitchen.
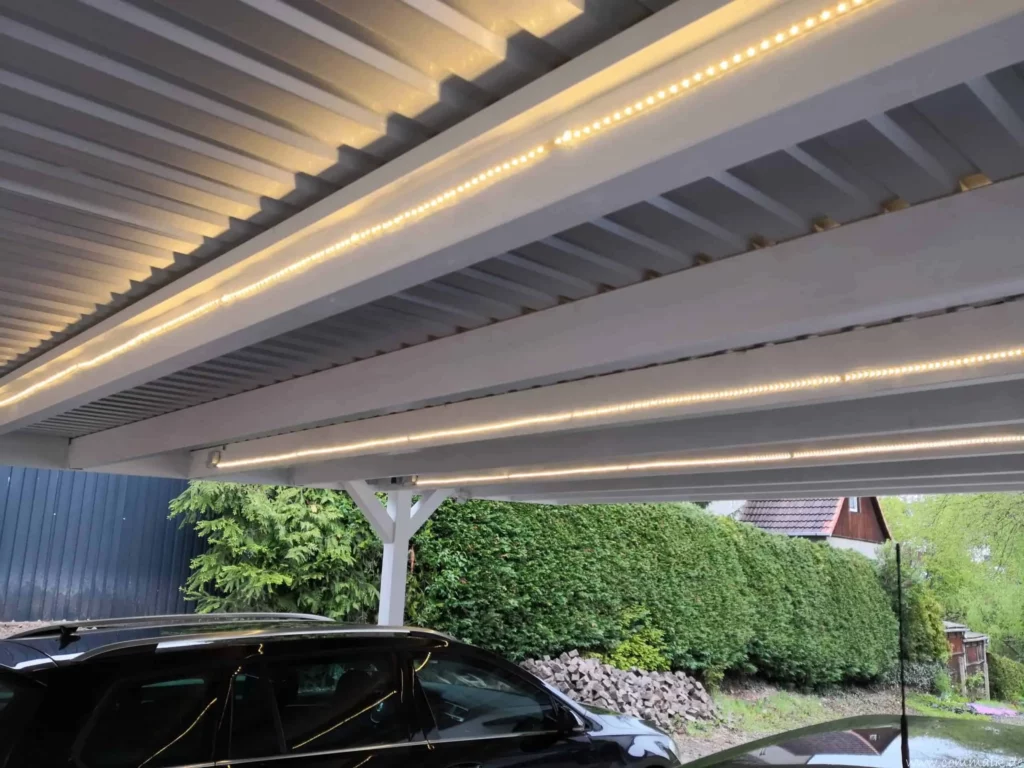
Illuminating the Design: Strategic Lighting
The full potential of open shelving cannot be realized without thoughtful lighting. Poor lighting can leave shelves looking dull and create shadow zones, particularly under the bottom shelf, hindering visibility on the countertop below.

Under-Shelf LED Strips
Integrating LED strip lighting beneath the first shelf is a highly effective way to illuminate both the display and the workspace. When concealed within an aluminum profile with a milky diffuser, the light is softly and evenly dispersed across the countertop, providing functional task lighting without harsh glare. This not only highlights the items on the shelf but also brightens the prep area below.
Color Temperature Considerations
The color temperature of the lighting significantly impacts the ambiance and how colors appear in the kitchen. A warm white (3000K) to natural white (4000K) temperature is generally recommended. These warmer tones enhance the freshness of food items and contribute to a cozy, inviting atmosphere. Conversely, cool white LED lights (6000K and above), which emit a bluish tint, can make the kitchen appear stark, sterile, and uninviting, akin to hospital lighting.
Common Pitfalls to Avoid
Many open shelving experiments falter due to a lack of awareness regarding fundamental design and maintenance principles. Avoiding these common mistakes is crucial for success.
Displaying Unattractive Appliances
Open shelves are for showcasing curated beauty, not for stashing functional but unsightly appliances. Old, discolored plastic blenders, yellowed mixers, or outdated toasters should be relegated to closed cabinets. The only exception is if you possess a collection of premium, design-forward appliances (e.g., Smeg or KitchenAid) that perfectly complement your kitchen’s color scheme and aesthetic. Otherwise, hide them.

The Crucial Role of a Cooker Hood
A kitchen is a zone of culinary activity, generating steam, smoke, and airborne grease particles. Installing open shelves directly above a cooking range without a powerful and efficient cooker hood is a recipe for disaster. Grease and cooking residue will inevitably settle on your displayed items, making them sticky, dirty, and unhygienic in a matter of weeks. Open shelves are best placed away from the immediate splash zone of the hob, perhaps in a coffee bar area or adjacent to the sink.
The Peril of Mismatched Glassware
A collection of souvenir mugs, assorted old coffee cups, and various syrup glasses instantly creates visual chaos. Strict curation of glassware is essential. Store these "hodgepodge" items in a closed drawer or cabinet. Instead, display a single, cohesive set of clear textured glass tumblers or a uniform collection of ceramic mugs on your open shelves. Consistency in material and design is key to a polished look.
Sustaining the ‘Magazine-Ready’ Look: Maintenance Essentials
The enduring beauty of an open-shelf kitchen hinges on absolute cleanliness. Even the most exquisitely designed shelves will lose their charm if covered in a thin film of dust or grease.
Regular cleaning is non-negotiable. A weekly dusting of the wooden shelves with a dry microfiber cloth will remove surface dust. A light wood cleaner can be applied monthly to nourish the wood fibers and maintain their luster. Crucially, ensure that all washed dishes are completely dry before being returned to the shelves. Persistent water droplets can damage the wood’s finish and encourage mold growth.

Implementing a quarterly rotation of displayed items is also highly recommended. This practice not only refreshes the visual appeal of your kitchen but also forces a thorough cleaning of all items and the often-neglected corners of the shelves. This proactive approach ensures your open shelves remain consistently "magazine-ready."
Expert Insights and FAQs
- Are open shelves suitable for very small kitchens (e.g., studio apartments)? Absolutely. Replacing bulky upper cabinets with slim, open shelves creates an immediate illusion of greater space and openness, making a small kitchen feel significantly larger and less confined.
- What is the best material for shelves near wet areas like the sink? Avoid compressed wood products like MDF or particle board, which are susceptible to moisture damage. Opt for solid wood treated with a water-resistant polyurethane coating, or consider stainless steel shelves with a durable powder coating for maximum resistance to moisture and corrosion.
- What is the maximum weight a long floating shelf can hold? The load-bearing capacity of a floating shelf heavily depends on the quality and installation of its hidden brackets. Heavy-duty brackets properly installed into solid brick or concrete walls can typically support between 15 kg to 25 kg (33 to 55 lbs) per linear meter. It is always advisable to consult with a professional carpenter or installer for specific load calculations and installation recommendations.
Conclusion: Execute Your Aesthetic Kitchen Design Now
The aspiration of an elegant open-shelf kitchen is entirely achievable when guided by technical precision, aesthetic discipline, and a commitment to ongoing maintenance. True beauty in interior design stems from order, thoughtful proportion, and the strategic use of negative space.
Embrace the 60/40 rule, reserving 40% of shelf capacity for empty space. Meticulously measure to ensure the first shelf is at least 45 cm from the countertop, and limit your display palette to a maximum of two to three harmonious color shades. By integrating these specifications and design principles, you will not only avert the common pitfalls of visual clutter but also successfully transform your cooking area into one of the most photogenic and functional spaces in your home. The journey to a beautifully curated kitchen begins with disciplined choices and a clear vision.