The kitchen, often considered the heart of the home, is a nexus of culinary activity, social gathering, and daily routine. Within this vibrant space, the area directly behind the cooking range, commonly known as the backsplash, plays a dual critical role: safeguarding walls from the rigors of high heat and grease splatters, while simultaneously serving as a pivotal design element that can define the entire room’s aesthetic. A strategic update to this often-overlooked surface presents an effective avenue for homeowners to revitalize their kitchen’s appearance without committing to the extensive time and significant financial outlay of a full-scale renovation. InteriorDesign.ID explores this growing trend, offering a comprehensive guide to material selection, installation techniques, and maintenance protocols that blend practicality with contemporary style.
The Strategic Allure of Micro-Renovations in Kitchen Design
In an era where home improvement budgets are carefully scrutinized and time is a precious commodity, the concept of "micro-upgrades" has gained considerable traction. A complete kitchen overhaul, encompassing new cabinetry, countertops, and appliances, can easily run into tens of thousands of dollars and disrupt daily life for weeks or even months. Recognizing this, homeowners are increasingly opting for targeted enhancements that deliver maximum visual impact with minimal investment. The kitchen backsplash, by virtue of its prominent location and relatively small surface area, perfectly embodies this philosophy.
According to recent market analyses, the global kitchen remodeling market, valued at over $60 billion annually, continues to see robust growth, with a notable segment dedicated to smaller, impactful projects. A significant portion of this growth is attributed to the rise of DIY culture and a desire for personalized spaces that reflect current trends without the associated renovation fatigue. By focusing resources on a high-visibility area like the backsplash, homeowners can inject fresh energy and a renewed sense of style into their kitchens, effectively creating a perceived upgrade for the entire space. This strategic allocation of budget and effort not only saves time but also significantly reduces expenditure compared to comprehensive renovations, proving to be a rational and increasingly popular alternative.
Upholding Safety Standards in the Culinary Zone

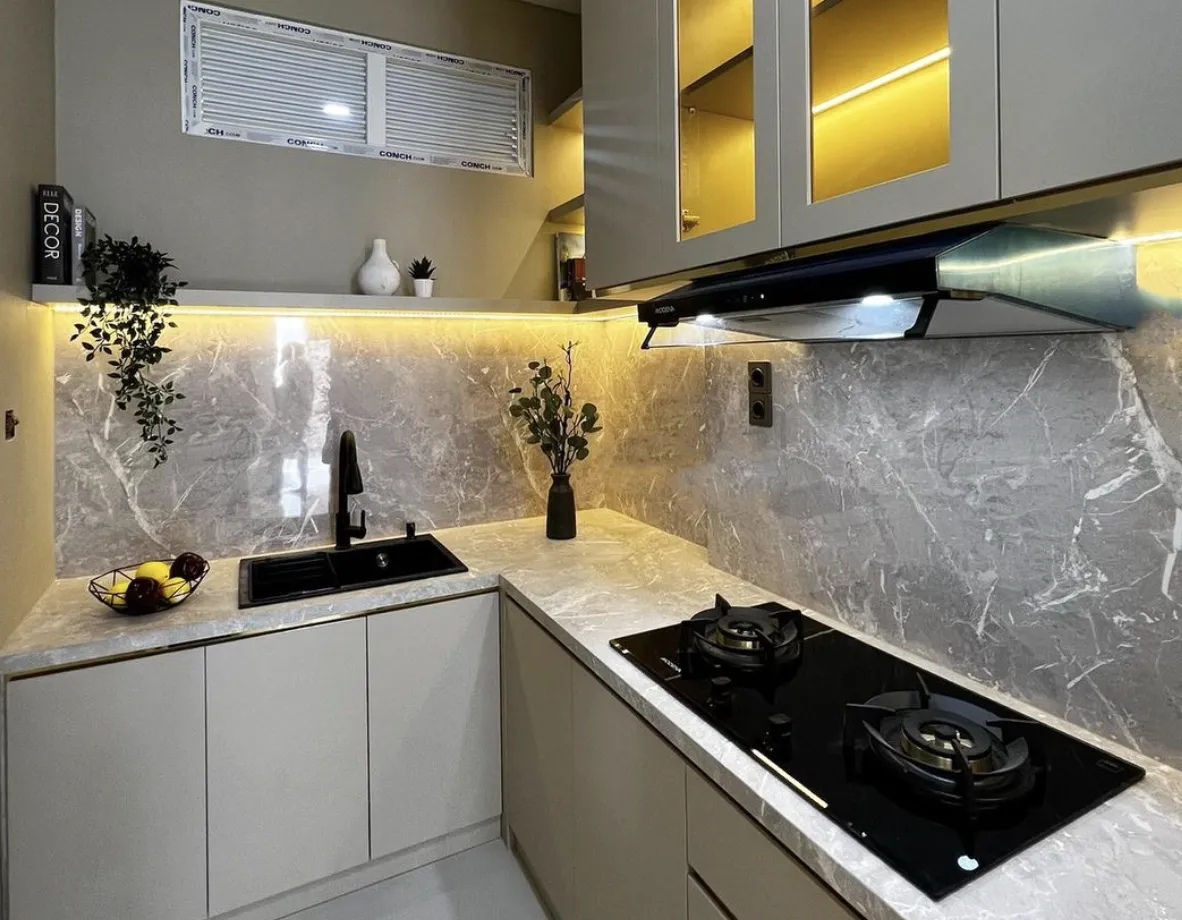
Beyond its aesthetic contribution, the primary function of a kitchen backsplash, particularly in the vicinity of the cooking hob, is one of fundamental safety and structural protection. The area directly behind a gas or electric range is subjected to constant exposure from intense heat, steam, and corrosive cooking byproducts. Ordinary painted walls are ill-equipped to withstand such conditions, leading to rapid degradation, peeling paint, and a buildup of grease and grime that can pose a significant fire hazard. The National Fire Protection Association (NFPA) consistently highlights kitchen fires as a leading cause of home fires, underscoring the critical need for appropriate, heat-resistant materials in cooking zones.
Industry standards typically recommend a minimum safe distance of 15-20 centimeters (approximately 6-8 inches) between a built-in hob and the adjacent wall. However, even with this clearance, radiant heat remains substantial. Consequently, the selection of a robust, non-combustible, and heat-resistant material for the backsplash is not merely a design choice but a technical imperative that ensures the longevity and safety of the kitchen environment. Neglecting this crucial aspect can lead to accelerated wear and tear, costly future repairs, and, most importantly, compromise household safety.
A Deep Dive into Backsplash Material Science: Durability Meets Design
Choosing the right backsplash material requires a careful balance between aesthetic appeal and practical performance, especially given the harsh conditions prevalent behind a stove. Materials must not only withstand high temperatures but also resist grease splatters, moisture, and common kitchen stains. Below is a comparative analysis of popular options:
1. Ceramic and Porcelain: The Enduring Choice
Ceramic and porcelain tiles remain a cornerstone of kitchen design, owing to their exceptional durability and versatility. Manufactured through high-temperature firing processes, these materials possess inherent heat resistance, making them ideally suited for stove areas. Porcelain, in particular, boasts a very low water absorption rate (typically less than 0.5%), which translates to superior stain resistance. Spills from turmeric, soy sauce, or acidic foods are unlikely to penetrate its dense surface, making cleanup a simple wipe-down with a damp cloth and mild dish soap. Available in an exhaustive array of colors, textures, and patterns, from classic subway tiles to intricate mosaics, ceramic and porcelain offer endless design possibilities. Their cost-effectiveness, generally ranging from $2 to $15 per square foot for basic options, further solidifies their position as a preferred choice for both renovators and professional designers.
2. Tempered Glass: Sleek, Seamless, and Resilient
Tempered glass, produced by subjecting regular glass to extreme heating and rapid cooling, gains significantly enhanced strength and thermal shock resistance. It is approximately four to five times stronger than annealed glass of the same thickness. Its primary advantage as a backsplash material is the absence of grout lines, creating a smooth, monolithic surface that is exceptionally easy to clean and maintain. This seamless quality not only promotes superior hygiene by preventing grime accumulation but also lends a modern, minimalist aesthetic to the kitchen. Tempered glass can be back-painted in any color, offering a customizable look, or left clear to reveal the wall behind, providing depth and visual interest. While typically more expensive than ceramic, ranging from $10 to $40 per square foot, its sleek appearance and ease of maintenance justify the investment for many homeowners.

3. Stainless Steel: Professional-Grade Durability
Commonly found in commercial kitchens and high-performance residential settings, Type 304 stainless steel is celebrated for its exceptional resistance to heat, corrosion, and chemical agents. Its non-porous surface is highly hygienic, making it an excellent choice for areas prone to heavy use. Stainless steel backsplashes, often paired with large freestanding ranges, offer a distinctly industrial or professional aesthetic. The material’s reflective properties can also help brighten a kitchen by bouncing light around the space. However, stainless steel requires frequent wiping to maintain its pristine appearance, as fingerprints, water spots, and grease smudges are readily visible. Costs generally range from $8 to $30 per square foot, depending on gauge and finish.
4. Natural Stone (Marble and Granit): Timeless Elegance with Caveats
For those seeking a touch of natural luxury, materials like marble and granite provide unparalleled organic beauty and texture. Granit, with its dense composition and impressive heat resistance (up to 1,200°F or 650°C for short periods), is a highly durable option that can often be seamlessly matched with existing countertops for a cohesive look. Marble, while exquisitely beautiful, is softer and more porous than granite, making it susceptible to etching from acidic foods (e.g., lemon juice, vinegar) and staining if spills are not promptly cleaned. Both marble and granite are porous materials, necessitating regular sealing to prevent the absorption of liquids and subsequent staining. Expert installation is also crucial, and ongoing maintenance with specialized stone cleaners and periodic re-sealing is required to preserve their beauty. Natural stone is typically the most expensive option, ranging from $25 to $100+ per square foot.
Materials to Approach with Caution: The Perils of Peel-and-Stick in High-Heat Zones
While tempting for their affordability and ease of installation, peel-and-stick backsplash tiles, often made from vinyl or PVC plastic, are generally unsuitable for the high-heat environment directly behind a stove. These materials have a low melting point and are prone to warping, bubbling, and adhesive degradation when exposed to constant radiant heat. The adhesive can melt and lose its grip, causing the tiles to peel and sag, creating an unsightly and potentially hazardous situation. While these adhesive tiles can be a viable, temporary solution for low-moisture, low-heat areas like a bathroom vanity or a wall adjacent to a sink, their application near a cooking range is strongly advised against by most design and safety experts.
Design Dynamics: Elevating Aesthetics with Pattern and Grout
Beyond the material itself, the method of tile installation and the choice of grout significantly influence the final aesthetic and functional performance of a backsplash.
Tiling Patterns: Crafting Visual Interest
The way tiles are arranged can dramatically alter the perception of a space.

- Classic Subway (Brick Bond): This timeless pattern, featuring rectangular tiles (e.g., 10×20 cm or 7×15 cm) staggered like bricks, offers a clean, versatile look. It complements various styles, from farmhouse and Scandinavian to industrial. Using contrasting grout colors (e.g., dark grout with white tiles) can highlight the pattern.
- Vertical Stack: Arranging rectangular tiles vertically in a straight, non-staggered line can create an illusion of greater ceiling height, making smaller kitchens feel more expansive. This minimalist pattern is popular in Japandi or mid-century modern designs.
- Herringbone: This sophisticated zig-zag pattern, typically laid at a 45-degree angle, adds dynamic visual texture and a sense of movement. It requires precise cutting and meticulous installation to achieve symmetrical angles, often making it a choice for homeowners seeking a statement piece.
- Patterned Accent Tiles: For kitchens with monochromatic cabinetry, a section of patterned tiles, such as geometric cement tiles, can serve as a captivating focal point. By limiting these bold patterns to the backsplash area behind the stove, one can introduce visual interest without overwhelming the space.
The Grout Factor: Beyond Mere Filling
The choice of grout, the material used to fill the spaces between tiles, is often an afterthought but is crucial for both aesthetics and durability. Traditional cement-based grouts are porous and prone to absorbing stains, especially in a greasy kitchen environment. Over time, white grout can yellow or brown, diminishing the pristine appearance of the backsplash.
- Embracing Epoxy Grout: For high-traffic, high-moisture areas like a kitchen backsplash, epoxy grout is a superior alternative. Composed of resin and a hardener, epoxy grout is dense, non-porous, and highly resistant to stains, chemicals, and moisture. Grease, cooking splatters, and acidic liquids simply wipe clean without leaving residual discoloration. While more challenging to install and slightly more expensive than cementitious grout, its long-term benefits in terms of maintenance and aesthetics are invaluable.
- Strategic Grout Color: If conventional cementitious grout is used, opting for darker shades like medium grey or charcoal can effectively camouflage stains and discoloration over time. Darker grout lines also provide a strong visual contrast, defining the tile pattern more sharply.
Empowering the Homeowner: A DIY Installation Guide
For the motivated homeowner looking to undertake a backsplash upgrade without disturbing existing cabinetry, a methodical approach is key. This micro-renovation project, while manageable, requires attention to detail and proper preparation.
1. Meticulous Wall Preparation: The foundation of a lasting backsplash is a clean, sound surface. Begin by thoroughly degreasing the existing wall. Utilize a heavy-duty kitchen degreaser, spraying the surface and scrubbing diligently to remove all traces of oil and grime. Following this, lightly sand the wall to create a slightly abrasive texture. This step significantly improves the adhesion of the tile mastic. Ensure the wall is completely dry before proceeding.
2. Comprehensive Workspace Protection: Protect adjacent surfaces from adhesive spills and debris. Lay thick cardboard or plastic sheeting over the countertop and stove, securing the edges with painter’s tape. Extend this protection to the underside of overhead cabinets to prevent accidental drips.
3. Applying the Adhesive Mastic: For small backsplash areas, pre-mixed tile mastic offers convenience as it eliminates the need for water mixing. Using a notched trowel, apply the mastic evenly to a small section of the wall. Avoid applying too much at once, as mastic can skin over and lose its adhesive properties before tiles are set. Work in manageable sections, typically no larger than 2-3 square feet.

4. Precision Tile Placement and Cutting: Begin tiling from the center of the backsplash area and work outwards. This ensures symmetry and a balanced appearance. Insert tile spacers (cross-shaped plastic pieces) at each corner of the tiles to maintain consistent grout lines. For the perimeter tiles that meet walls or cabinets, precise cutting is required. A manual tile cutter is usually sufficient for most ceramic and porcelain tiles, while a wet saw might be necessary for harder materials or more intricate cuts.
5. Grouting and Finishing Touches: Allow the tile adhesive to cure for at least 24 hours, or as per the manufacturer’s instructions, before removing the tile spacers. Prepare the chosen grout (epoxy or cementitious) according to instructions. Apply the grout into the tile gaps using a rubber float, ensuring all voids are filled. Immediately after application, use a damp sponge to wipe away excess grout from the tile surfaces, working in small sections to prevent the grout from hardening on the tiles. Once the grout has cured (typically 24-48 hours), apply a bead of silicone sealant along the joint where the backsplash meets the countertop. This flexible seal prevents water penetration and accommodates slight movements between surfaces.
Maintaining Brilliance: Effective Cleaning Strategies
Proper maintenance is essential to preserve the beauty and integrity of your backsplash. Different materials require specific care routines.
1. Avoid Harsh Acidic Cleaners: Strong acid-based cleaners or limescale removers can damage the protective glaze on ceramic tiles, etch natural stone surfaces, and degrade cementitious grout. Always check the cleaner’s pH level and material compatibility before use.
2. Embrace Mild Alkaline Solutions: For everyday grease and grime, mild alkaline cleaners are highly effective. A simple solution of warm water and dish soap, sprayed onto the backsplash and allowed to sit for a few minutes, will help break down grease. Wipe clean with a soft microfiber cloth. For stainless steel, specialized cleaners designed to prevent streaks and maintain its luster are recommended.

3. Tackling Dried-On Stains: Never use abrasive steel wool brushes on tile surfaces, as they will cause scratches. For stubborn, dried-on food splatters, create a thick paste using baking soda and water. Apply the paste directly to the stain and let it sit for 15-30 minutes. The gentle abrasive nature of baking soda, combined with its mild alkalinity, can effectively lift tough stains without damaging the surface. Wipe clean with a damp cloth. For natural stone, consult with a stone care professional for appropriate stain removal techniques to avoid irreversible damage.
Beyond the Surface: Lighting and Finishing Touches
Thoughtful details can significantly enhance the impact of a new backsplash.
1. Strategic Lighting: Under-cabinet LED strip lighting is an excellent way to illuminate the backsplash, highlighting its texture, color, and pattern. Position the lights to shine directly onto the backsplash rather than straight down onto the countertop to create a dramatic, inviting glow that also improves task lighting in the cooking area. Warm white (2700K-3000K) or neutral white (3500K-4000K) LEDs are generally preferred for kitchen environments.
2. Refined Edge Finishing: If your backsplash ends abruptly on a bare wall rather than meeting a cabinet or another wall, the exposed raw edges of the tiles can appear unfinished. Tile trims, available in materials like aluminum, PVC, or even ceramic, provide a clean, professional finish. These trims are installed before the final row of tiles, encapsulating the raw edge and preventing sharp surfaces while creating a polished transition.
Investment and Impact: Cost-Benefit Analysis and Color Psychology

A backsplash upgrade is a relatively small investment with a disproportionately high return in terms of visual impact and potential home value. A standard backsplash area behind a 90 cm (35-inch) wide stove, with a height of 60 cm (24 inches), covers approximately 0.54 square meters (about 5.8 square feet). This means material costs are contained, often requiring only one or two boxes of tiles, along with small quantities of adhesive and grout.
Regarding color selection, white remains a perennially popular choice, offering a sense of cleanliness, brightness, and spaciousness. However, if your kitchen cabinetry features warm wood tones, introducing a secondary color through the backsplash can create depth and character. Hues like muted sage green can evoke a sense of calm and nature, while matte black can provide a sophisticated, contemporary contrast without making the space feel cluttered, especially when paired with lighter elements. Color psychology in kitchen design suggests that thoughtful color choices can influence mood and perception, making the backsplash an ideal canvas for subtle yet impactful statements.
Conclusion: A Strategic Enhancement for the Modern Kitchen
Upgrading the kitchen backsplash behind the stove is a highly effective, practical, and often budget-friendly approach to revitalizing the entire kitchen space. By prioritizing durable, heat-resistant materials, selecting stain-resistant grout, and paying meticulous attention to installation and finishing details, homeowners can achieve a professional-grade result that enhances both the safety and aesthetic appeal of their culinary hub. This targeted micro-renovation not only protects the structural integrity of the walls but also serves as a powerful design statement, reflecting contemporary trends and personal style.
Let this comprehensive guide from InteriorDesign.ID serve as your definitive roadmap to a successful and satisfying kitchen backsplash renovation. Share this article with friends or family embarking on their own home improvement journeys to inspire a stress-free and visually rewarding kitchen transformation.