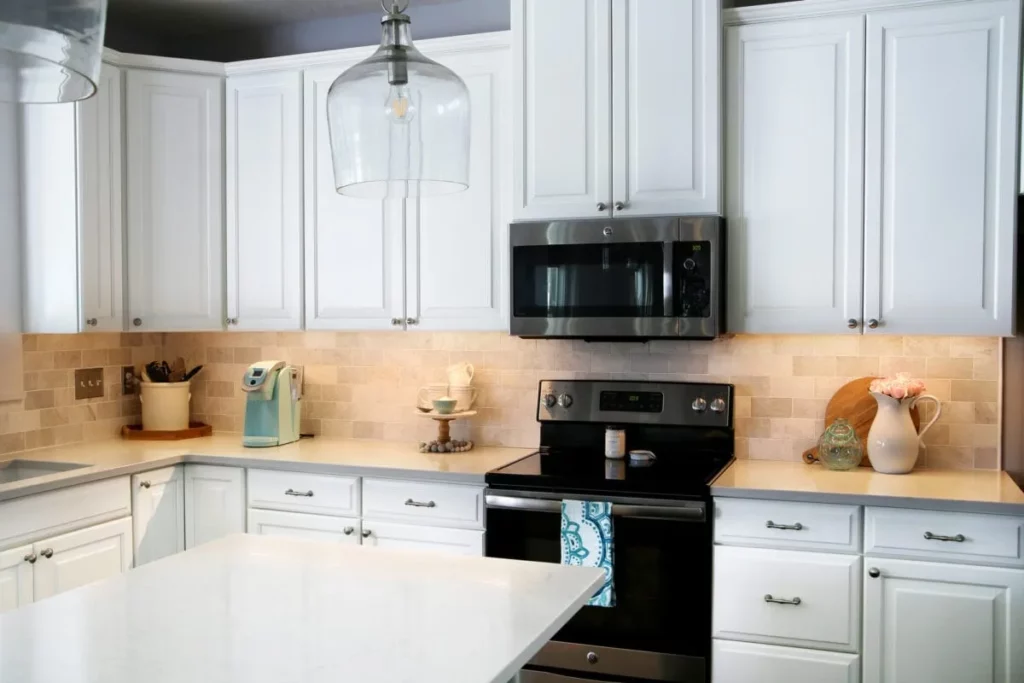
Under-cabinet lighting in the kitchen is a sophisticated yet practical hidden illumination system installed beneath wall-mounted cabinets, specifically designed to brighten countertops and work surfaces. Its primary objective is straightforward: to eliminate the shadows cast by a person’s body while performing kitchen tasks, thereby ensuring a safer and more efficient environment for food preparation. For many homeowners, struggling with dimly lit kitchen areas or persistent shadows while chopping vegetables or measuring ingredients, relying solely on overhead ceiling lights often proves insufficient. Industry observations consistently show that incorporating under-cabinet lighting significantly enhances the functionality and aesthetic appeal of a kitchen, often without requiring extensive renovations. This comprehensive guide delves into suitable lighting options, strategies for achieving glare-free illumination, and a detailed breakdown of budget considerations, offering insights for both DIY enthusiasts and those seeking professional installation.
Beyond the Overhead: Why Traditional Lighting Falls Short
A common misconception among homeowners is that a bright overhead ceiling light is adequate for all kitchen lighting needs. However, the physics of light dictates that when an individual stands facing a countertop, their body inevitably blocks the light source coming from behind or above. This often results in the critical work areas—precisely where sharp knives and delicate ingredients are handled—being plunged into shadow. This phenomenon not only compromises safety but also leads to eye strain and reduced efficiency.
Under-cabinet lighting is specifically classified as "task lighting." Its singular focus is to compensate for this inherent weakness in general ambient lighting by directing illumination precisely where it’s needed. The immediate benefit is enhanced visibility for chopping, dicing, and other intricate culinary activities, dramatically improving user comfort and safety. Beyond its practical utility, under-cabinet lighting also introduces a new visual dimension to the kitchen, especially during evening hours. When the main overhead lights are switched off, the soft glow from under-cabinet fixtures can transform the kitchen into a welcoming, subtly lit space. This softer illumination is particularly gentle on the eyes, ideal for late-night hydration or a quick snack without the harshness of full room lighting. This layered lighting approach, combining ambient, task, and accent lighting, is a hallmark of professional interior design, ensuring both functionality and mood.
The Evolution of Kitchen Illumination: From Fluorescent to Smart LEDs
The landscape of kitchen lighting has undergone a significant transformation over the decades, driven by advancements in technology and evolving design sensibilities. Historically, kitchens often relied on a single incandescent bulb or, later, fluorescent tubes for general illumination. While these provided basic light, they lacked the precision and aesthetic finesse demanded by modern culinary spaces. The 1980s and 90s saw a rise in the popularity of T5 fluorescent tubes for under-cabinet applications due to their slim profile and relatively good brightness. However, these fixtures had notable drawbacks: they consumed more electricity, generated considerable heat, were prone to breakage, and often produced a stark, unflattering light. The heat emitted could also affect temperature-sensitive items stored in the cabinets above.
The turn of the millennium marked the beginning of the LED revolution. Light Emitting Diodes (LEDs) rapidly superseded older technologies due to their unparalleled energy efficiency, extended lifespan (often tens of thousands of hours), durability, and compact size. This technological leap allowed for unprecedented design flexibility, enabling the creation of discreet, powerful, and cool-to-the-touch lighting solutions like LED strips and bars. Today, LED technology dominates the market, offering a vast spectrum of color temperatures, dimming capabilities, and even smart home integration, making under-cabinet lighting not just a functional necessity but a sophisticated design element.
Crafting the Perfect Glow: Achieving Even, Glare-Free Lighting

The hallmark of a well-installed under-cabinet lighting system is illumination that is uniform, gentle on the eyes, and free from harsh spots or reflections. Glare, a common issue, typically arises from the reflection of direct LED points off highly polished countertop surfaces such as granite, marble, or quartz. These reflective materials can bounce concentrated light points directly into the user’s eyes, causing discomfort and distraction.
The most effective solution to combat glare is the integration of a diffuser. These are typically translucent acrylic covers, often milky white or frosted, installed over the LED strips or within the LED channels. Diffusers effectively break up the individual light points into a softer, more continuous glow, distributing the light evenly across the countertop without the harshness.
Beyond diffusers, the positioning of the light fixture is paramount. If the light is installed too far back, flush against the backsplash, its beam may not reach the center of the countertop, leaving the front edge of the work surface inadequately lit. The optimal placement is slightly forward, recessed just behind the front lip of the upper cabinet. This strategic positioning ensures that the light falls perfectly onto the work surface, providing ample illumination, while simultaneously concealing the light fixture itself from direct view, maintaining a clean and streamlined aesthetic. This thoughtful placement is crucial for both functional efficiency and visual comfort.
Decoding Your Options: Types of Under-Cabinet Lighting
The market offers a diverse array of under-cabinet lighting options, each with distinct characteristics regarding installation, aesthetic, and functionality.
- LED Strip Lights: These are thin, flexible tapes embedded with numerous small LED chips, typically featuring an adhesive backing for easy application. Their primary advantage lies in their ultra-slim profile, allowing them to be discreetly tucked away beneath even the thinnest cabinet plates, making them virtually invisible. However, without a proper diffuser, the individual LED points can create noticeable reflections on glossy countertops. For kitchen environments, it’s advisable to choose LED strips with an appropriate IP (Ingress Protection) rating (e.g., IP44 or higher) to ensure resistance against moisture and dust, which are common in kitchens.
- LED Bar Lights: For those seeking a more robust and pre-assembled solution, LED bars offer a convenient alternative. These rigid fixtures often come with an integrated diffuser and mounting brackets, simplifying the installation process. Modern LED bars frequently feature connectors that allow multiple units to be seamlessly linked, creating continuous runs of light without visible gaps. Their uniform light output and ease of DIY installation make them a popular choice for homeowners.
- Puck Lights: Shaped like hockey pucks, these circular fixtures emit a conical beam of light. They are excellent for creating accent lighting, particularly effective at highlighting unique backsplash textures, such as exposed brick or mosaic tiles. However, for general task lighting, their concentrated beams can create "hot spots" of light interspersed with darker areas, leading to uneven illumination across the countertop. This makes them less ideal for detailed food preparation where consistent light is crucial.
- T5 Fluorescent Lights: Before the advent of LEDs, T5 fluorescent tubes were a common choice for under-cabinet lighting. While they provided bright illumination, they suffered from several disadvantages: high energy consumption, significant heat generation (which could affect stored items), fragility, and a shorter lifespan compared to modern LEDs. Their large form factor also made discreet installation challenging. Given the superior alternatives available today, T5 fluorescents are largely considered obsolete for new installations.
The Science of Light: Color Temperature (Kelvin) and Brightness (Lumens)
Selecting the correct color temperature and brightness is critical to ensuring your kitchen is both functional and inviting. Color temperature, measured in Kelvin (K), describes the perceived warmth or coolness of light, significantly influencing the mood and utility of a space.
- Warm White (2700K – 3000K): Emits a soft, yellowish glow reminiscent of traditional incandescent bulbs. This temperature is ideal for creating a cozy, inviting atmosphere, often complementing classic kitchen designs, natural wood finishes, or open-concept spaces that flow into living areas.
- Natural White (4000K): Often considered the safest and most versatile choice for residential kitchens. It provides a clean, crisp white light without any blueish tint. This neutral tone ensures that the true colors of ingredients—from vibrant greens of vegetables to the rich reds of meat—are accurately rendered, which is crucial for safe and effective food preparation. It is also comfortable for the eyes during extended periods of focus.
- Cool White (5000K – 6000K): Produces a sharp, bluish-white light typically found in commercial settings. While providing high visibility, it can feel overly sterile or clinical in a home kitchen, potentially creating an unwelcoming ambiance.
Beyond color temperature, another crucial metric is Color Rendering Index (CRI). CRI measures how accurately a light source reveals the true colors of objects compared to natural light. For kitchen task lighting, a high CRI (90+) is highly recommended to ensure ingredients appear vibrant and true-to-life, enhancing both safety and culinary precision.
Brightness (Lumens): The intensity of light is measured in lumens, not watts. Wattage indicates energy consumption, while lumens measure light output. For effective countertop task lighting, a range of 250 to 400 lumens per 30 centimeters (approximately one foot) is generally considered ideal. This level of brightness ensures that cutting boards are well-illuminated without causing eye fatigue. When purchasing LED strip rolls, a good benchmark is around 1000 lumens per meter. Incorporating a dimmer switch is also highly recommended, allowing users to adjust the light intensity to suit different tasks or to create varying moods, from bright task lighting to a soft ambient glow.

Seamless Integration: Installation Systems and Budget Considerations
The chosen installation method significantly impacts both the aesthetic outcome and the complexity of the project.
- Hardwired (Tanam) System: In this method, the lighting’s electrical wiring is directly integrated into the home’s existing wall wiring. The lights are typically controlled by a standard wall switch. The primary advantage is a completely clean, wire-free appearance on the countertop, providing a polished and permanent finish. However, hardwiring requires the expertise of a qualified electrician and is most efficiently undertaken during a kitchen renovation or the initial installation of kitchen cabinets. This method generally offers higher resale value and better safety compliance.
- Plug-in (Colok) System: This simpler approach involves plugging the light fixtures directly into an existing kitchen outlet. It’s an excellent solution for kitchens that are already fully constructed, allowing for quick and relatively easy installation. Homeowners can often install these themselves by simply attaching the lights and plugging them in. The main drawback is the visible power cord running down to the outlet, and it occupies a valuable power socket. While less aesthetically seamless, it’s a cost-effective and flexible option for renters or those on a tighter budget.
Cost Estimation: The cost of installing under-cabinet lighting varies widely based on component quality, installation complexity, and whether professional services are engaged.
- Entry-Level (Rp150,000 – Rp300,000): This budget typically covers simple, plug-in LED strips with basic adaptors. It’s a practical and affordable option for temporary residences or those looking for a quick DIY solution.
- Mid-Range (Rp500,000 – Rp1,500,000): This tier allows for higher-quality LED bars or LED strips housed within aluminum profiles, offering better durability and a cleaner finish. Installation in this range might still be DIY but with more premium components, or involve basic professional assistance for plug-in systems.
- Premium (Above Rp2,000,000): This budget typically covers hardwired installations with high-end, robust light fixtures, smart LED systems (e.g., color-changing, app-controlled), and professional installation by certified electricians. This ensures a fully integrated, durable, and aesthetically superior system.
A critical point regardless of budget is to never skimp on the power supply (adaptor). A low-quality adaptor can hum, cause the LEDs to flicker imperceptibly (leading to eye strain and headaches), and significantly shorten the lifespan of the LED lights. Investing in a reputable, appropriately sized power supply is crucial for long-term performance and user comfort.
Avoiding Common Pitfalls: Expert Tips for Flawless Installation
While seemingly straightforward, installing under-cabinet lighting involves several technical details that can easily go awry. Being aware of these common mistakes can save time, money, and frustration:
- Glossy Countertop Reflections: If your kitchen features highly polished granite or quartz countertops, direct, un-diffused light will inevitably create distracting reflections. If possible, consider matte or honed finishes for new countertops to naturally diffuse light. For existing glossy surfaces, employing high-quality diffusers is non-negotiable.
- Improper Switch Placement: Placing the light switch in an inconvenient or obscure location within the kitchen defeats the purpose of easy access. The switch should ideally be positioned near the kitchen’s main entry point, ensuring effortless control upon entering or exiting the space. Consider touch-sensitive or motion-activated switches for ultimate convenience.
- Inconsistent Color Temperature: Mixing different color temperatures within the same visual field can create a jarring and unharmonious effect. For example, combining cool white (bluish-white) ceiling lights with warm white (yellowish-red) under-cabinet lights will clash. Strive for consistency or a carefully planned blend of color temperatures across all kitchen lighting fixtures for a cohesive aesthetic.
- Disrupted Corner Connections: In L-shaped or U-shaped kitchens, the corners of cabinets often become dark spots due to breaks in the lighting run. Specialized 90-degree LED connectors are available to maintain continuous electrical flow around corners without forcing sharp bends in the light strips, ensuring uniform illumination throughout the entire countertop length.
- Voltage Drop in Long Runs: For extended lengths of LED strips (typically over 5 meters for 12V systems), voltage drop can occur, causing the lights at the end of the run to appear dimmer. Using a 24V system or employing multiple power injection points can mitigate this issue, ensuring consistent brightness across the entire length.
The Smart Kitchen: Integrating Under-Cabinet Lighting into Your Connected Home
The advent of smart home technology has revolutionized how we interact with our living spaces, and under-cabinet lighting is no exception. Integrating these lights into a smart home ecosystem is now remarkably simple, typically requiring only a smart controller unit placed between the power adaptor and the lights.
This integration unlocks a wealth of convenient features:

- Voice Control: Command your lights with voice assistants like Google Assistant or Amazon Alexa, allowing hands-free operation while cooking.
- App Control: Adjust brightness, color temperature (if RGBW LEDs are used), and create custom lighting scenes directly from your smartphone or tablet.
- Automated Schedules: Program lights to dim automatically during dinner time, turn off at bedtime, or even gradually brighten in the morning.
- Motion and Proximity Sensors: Install sensors that activate the lights when motion is detected or when a hand waves nearby, offering hands-free operation that is particularly hygienic and practical when hands are wet or messy.
- Energy Management: Smart systems often provide insights into energy consumption, helping homeowners optimize usage and reduce electricity bills.
This level of control transforms under-cabinet lighting from a mere utility into an integral, responsive part of the modern smart home, enhancing both convenience and energy efficiency.
Beyond the Kitchen: Applying Indirect Lighting Principles Throughout Your Home
The principle of indirect or hidden lighting, so effective in kitchens, can be elegantly applied to other areas of the home to create ambiance and visual interest. Interior designers frequently utilize this concept to add depth and sophistication. For instance, many clients opt for concealed lighting within the architectural details of a bedroom headboard or behind floating shelves in a living room.
In a bedroom, positioning lights behind a headboard can create a striking "floating" effect for the bed, adding a touch of luxury and softness. However, material considerations are crucial. While velvet upholstery might appear beautiful when bathed in a soft glow, it can easily show oil stains from hands. Materials like HPL (High-Pressure Laminate) with wood grain patterns or synthetic leather finishes are often more durable, easier to clean, and still beautifully capture the diffused light from LEDs, making them practical choices for such applications. Similarly, in living rooms, indirect lighting in ceiling coves, behind media consoles, or beneath built-in cabinetry can create a warm, layered lighting scheme that enhances architectural features and defines spaces without harsh direct light.
DIY Installation Guide: A Step-by-Step Overview (for plug-in LED profile)
For those opting for a DIY plug-in system using LED strips within an aluminum profile, the process is manageable with basic tools:
- Measure and Cut: Accurately measure the length of the underside of your wall cabinets. Using a hacksaw or specialized metal saw, carefully cut the aluminum profiles to the required lengths.
- Mount Brackets: Attach the mounting clips or brackets to the underside of the cabinets using short screws, ensuring they are evenly spaced and securely fastened.
- Install LED Strip: Peel off the adhesive backing from the LED strip and gently press it into the base of the aluminum channel. Ensure it is straight and firmly adhered.
- Attach Diffuser: Snap the acrylic diffuser cover onto the aluminum profile, starting from one end and pressing firmly until it clicks securely into place along its entire length.
- Connect Power: Connect the LED strip’s cable to the power supply (adaptor).
- Cable Management: Neatly route any visible excess cabling, securing it with double-sided tape or cable clips to prevent it from dangling or creating an unsightly mess. Plug the adaptor into a nearby electrical outlet.
Longevity and Performance: Maintaining Your Under-Cabinet Lighting
Kitchen environments are inherently challenging for electronics due to the presence of heat, steam, and airborne grease particles. Over time, these elements can cause the protective covers of your under-cabinet lights to become cloudy or grimy, diminishing light output.
- Cleaning: For installations with acrylic diffusers, regular cleaning is simple. Use a soft, damp cloth with a small amount of mild dish soap to wipe the underside of the diffuser. Crucially, never spray cleaning liquid directly onto the light fixture as moisture can seep into the LED board and cause damage. Always apply cleaner to the cloth first.
- Power Supply Check: Periodically, perhaps every few months, check your power supply (adaptor). It’s normal for an adaptor to feel slightly warm during operation. However, if it feels excessively hot to the touch, it indicates that the adaptor’s amperage capacity might be too low for the connected lights, causing it to overheat. This situation can shorten the lifespan of both the adaptor and the LEDs, and in extreme cases, pose a fire hazard. Promptly replace an overheating adaptor with one of appropriate capacity.
Calculating Power Supply Capacity: The longevity and stable performance of LED lighting are heavily reliant on an adequately sized power supply. A fundamental rule of thumb is to incorporate a 20% buffer (headroom) for the power supply’s capacity.

Example: If you require a 12V LED strip that consumes 10 Watts per meter, and you need a total length of 5 meters, the total power draw would be 5 meters * 10 Watts/meter = 50 Watts. To prevent the power supply from overheating and failing prematurely, you should not purchase an adaptor rated for exactly 50 Watts. Instead, add a 20% buffer: 50 Watts + (20% of 50 Watts) = 50 Watts + 10 Watts = 60 Watts. Therefore, you should purchase an adaptor with a minimum capacity of 60 Watts (which for a 12V system translates to approximately 5 Amperes). This buffer ensures the power supply operates efficiently and lasts longer.
Aesthetic Integration: Under-Cabinet Lighting in Handleless Kitchens
The contemporary trend of handleless kitchens, characterized by their sleek, minimalist lines, often incorporates a "gola profile"—a continuous channel or groove that allows for easy opening of cabinet doors and drawers without external handles. Under-cabinet lighting can be seamlessly integrated into these gola profiles, further enhancing the modern aesthetic. The lights, tucked within these channels, cast a crisp, linear glow downwards, accentuating the clean lines and precision of the kitchen design. This integration creates a sophisticated visual effect, making the cabinets appear to float and adding a sense of spaciousness.
However, achieving this level of integration requires meticulous planning and coordination during the fabrication stage of the kitchen cabinets. The gola profiles must be precisely routed and finished to accommodate the lighting fixtures, often requiring custom work in the cabinet maker’s workshop. This method, while yielding a highly refined result, typically necessitates professional design and installation to ensure both functionality and aesthetic perfection.
Conclusion
Installing under-cabinet lighting is a strategic enhancement that simultaneously fulfills two crucial functions: it dramatically brightens the primary food preparation areas, thereby enhancing safety and efficiency, and it elevates the overall aesthetic appeal of the kitchen, creating a polished and inviting atmosphere. To achieve optimal results, key considerations include utilizing diffusers to mitigate glare from reflective surfaces and selecting a natural white color temperature (around 4000K) for accurate color rendering and visual comfort.
Homeowners can opt for a DIY plug-in installation for a quick and budget-friendly solution, or engage professional installers for a hardwired system that offers a seamless, integrated finish. The decision often hinges on budget, technical comfort, and desired aesthetic outcome. As kitchens continue to evolve into multifunctional hubs of the home, thoughtful lighting design, particularly under-cabinet illumination, remains an indispensable element for achieving both practicality and sophisticated style. For detailed consultations on interior lighting design or kitchen set upgrades, specialized design firms can provide expert guidance for your next project.
Frequently Asked Questions (FAQ)
Q: Is LED strip lighting resistant to stove steam and heat?
A: LED strips are relatively durable, especially when enclosed within an aluminum profile, which acts as a heatsink to dissipate heat. However, it’s advisable to strategically interrupt the light run directly above the stove burners to prevent direct exposure to intense steam and heat, which can shorten the lifespan of the LEDs and their adhesive.

Q: What is the ideal distance between under-cabinet lights and the countertop?
A: The standard distance between the base of the upper cabinet (where the lights are mounted) and the countertop typically ranges from 45 to 50 centimeters (18 to 20 inches). This height is generally considered ideal for achieving an even spread of light across the work surface.
Q: Is it better to use warm white (yellow) or natural white (white) light?
A: Natural white, typically around 4000K, is generally the most ideal choice for kitchen task lighting. It provides a clean, neutral white light that accurately renders the true colors of ingredients and food, which is essential for both safety and culinary precision. Warm white (2700K-3000K) is great for ambiance but can slightly alter food colors.
Q: Can I share a power outlet with the refrigerator for under-cabinet lighting?
A: It is strongly advised against sharing a power outlet with a refrigerator. Refrigerators draw a significant amount of current, especially when their compressor cycles on. This sudden surge in power can cause the LED lights to flicker and can prematurely damage the LED adaptor (power supply). Always seek a separate, dedicated power source for your under-cabinet lighting.
Q: What’s the difference between 12V and 24V LED installations?
A: 24V LED strips are recommended for longer runs, typically exceeding five meters (approximately 16 feet). In such lengths, a 12V system can experience "voltage drop," causing the lights at the far end to appear dimmer. For smaller kitchens or shorter runs, a 12V system is perfectly adequate and more common. 24V systems generally allow for longer runs with fewer power injection points.
Q: Are there any safety certifications I should look for when buying under-cabinet lighting?
A: Yes, look for certifications such as UL (Underwriters Laboratories), CE (Conformité Européenne), or SNI (Standar Nasional Indonesia) depending on your region. These certifications indicate that the product meets specific safety and performance standards.
Q: When should I consider hiring a professional for installation?
A: Hiring a professional is recommended for hardwired systems, custom installations (e.g., integrated into gola profiles), if you are uncomfortable with electrical work, or if you desire smart home integration that goes beyond simple plug-and-play. Professionals ensure safety, compliance with building codes, and a polished, long-lasting finish.